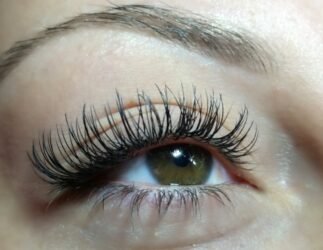
Long, voluminous lashes can transform your entire look, but regular visits to the salon for lash extensions can be both costly and time-consuming. Luckily, you don’t need to rely on expensive appointments to achieve gorgeous flawless lashes. With the right tools and techniques, you can achieve professional-looking DIY lash extensions that are both affordable and long-lasting.
If you’re new to the world of DIY lash extensions, the process may seem daunting at first. But with our 10 insider tips and tricks, you’ll be able to achieve stunning lashes in no time. In this blog post, we’ll guide you through everything you need to know about creating the best long-lasting DIY lash extensions at home, from choosing the right type of extensions to applying them correctly and caring for them properly.
Type of Lash Extensions
Choosing the right type of lash extensions is crucial when it comes to achieving the perfect DIY lash extensions. There are several types of lash extensions available in the market, such as mink, silk, synthetic, and more. Mink lashes are known for their natural look and are usually the most expensive option. When selecting lash extensions, consider your desired look, budget, and sensitivity to different materials. It’s always a good idea to do a patch test before applying the lash extensions to ensure you don’t have an allergic reaction to the material.
High-Quality Lash Adhesive
To achieve long-lasting DIY lash extensions, it’s important to use a high-quality lash adhesive. A good adhesive should be waterproof and contain cyanoacrylate, which helps it bond with your natural lashes. The right adhesive dries quickly, doesn’t leave clumps of glue on your lashes, and is easy to apply.
Natural Lashes
Preparing your natural lashes is essential to achieving the best results with your DIY lash extensions. To start, remove any makeup or debris from your lashes using an oil-free makeup remover or micellar water, then comb them gently with a clean lash brush to remove any tangles or knots. This will ensure that your natural lashes are smooth and ready for the lash extensions to adhere evenly.
Tools
Using the right tools is key to achieving flawless DIY lash extensions At the very least, make sure you have a pair of precision tweezers, lash adhesive, lash extensions, and a handheld mirror. Precision tweezers are essential for picking up and placing individual lash extensions, while lash adhesive ensures that the extensions stick to your natural lashes securely.
A handheld mirror is also a must-have tool, as it allows you to see up close what you’re doing and ensure that you’re applying the lash extensions evenly. In addition to the essential tools, several optional but great tools can make the process of applying DIY lash extensions easier and more efficient.
Apply Lash Extensions
Start by applying a small amount of lash adhesive to a flat surface, such as a piece of paper, and dip the tip of the lash extension into the adhesive. Use precision tweezers to carefully place the extension onto your natural lash, about 1 mm away from the root. Avoid placing the extension directly onto the root, as this can cause discomfort and damage to your natural lashes. Apply each lash extension individually, making sure to space them evenly and fill in any gaps. Once you have applied all the extensions, wait a few minutes to allow the adhesive to dry completely. Avoid getting your lashes wet or touching them for at least 24 hours to allow the adhesive to fully bond with your natural lashes.
Practice
Like any skill, applying DIY lash extensions takes practice to perfect. Start by practicing on a friend or family member before trying to apply the extensions to yourself. This will allow you to get comfortable with the tools and techniques involved and get feedback on your application. You can also watch tutorial videos online or take a class to learn more about the application process and get tips from experts.

 What You Need to Know about Health Insurance