Mastering the art of wallpaper application may initially seem like a task you’d earmark for the skilled hands of a professional decorator. However, with a dash of perseverance and a sharp eye for the finer details, you are well-equipped to embark on this home improvement voyage yourself. You’re bound to discover an array of contemporary shades and patterns—a far cry from the dated, curling floral prints that might haunt the corners of your abode. In this article, we’ll briefly let you know the DIY Bedroom Wallpaper Installation steps, choosing the right wallpapers with essential tools and maintenance.
Eschew the routine of slathering your domains with paint; instead, consider the transformative allure of wallpaper. With the proper know-how in your back pocket, wallpaper installation can mirror the time investment of painting, albeit with a twist of sophistication.
Arm yourself with this guide—your quintessential companion for all things wallpaper. Herein, we unpack the jargon, lay out the essential tools of the trade, and shepherd you through the nitty-gritty of wallpaper hanging from the get-go to the grand finale.
Choosing the Right Wallpaper
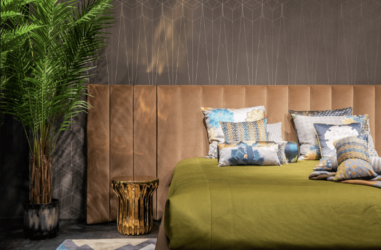
When it comes to picking the perfect wallpaper, keep in mind: that the world of interior design is a vast carousel of trends. What was once the rage in previous eras almost invariably stages a spirited return to the spotlight. As of 2024 interior design trends, wallpaper has risen, phoenix-like, to claim its place in the echelons of style, thanks in no small part to the penchant for bold motifs and a kaleidoscope of hues that allow personalities to shine through.
Given the recent epoch where our homes have doubled as sanctuaries and office spaces, the collective yearning leans towards infusing our habitats with an essence that resonates personally and profoundly.
5 Important Considerations for Your Home Renovation
Wallpaper stands as a marvel for injecting both vibrancy and texture into any room. Commonly, it’s available in three modes of installation: the convenience of peel and stick, the traditional unpasted (necessitating an external adhesive), or the hassle-free pre-pasted.
The latter simply calls for a brush with water to activate its adhesive properties and offers the charm of repositionability—an attribute that significantly eases the installation process. Certain pre-pasted variants boast the added benefit of being removable. Every roll of wallpaper is accompanied by its own set of application directives.
The golden rule? Pour over these instructions meticulously before diving in. By adhering to them, your transformational journey should culminate in a room that’s not just wallpapered, but exquisitely cocooned in your chosen design—invariably without a wrinkle of worry.
Essential Tools and Materials
If you’re hanging self-adhesive wall coverings, get ready to nab:
- A sponge
- A pail brimming with water
For those wallpapers craving separate adhesive:
- Your choice of wallpaper glue
- A paint roller to slick that pastes on smooth
- Gear up with these tools for your wallpaper endeavor:
- Quality measuring tape
- Reliable level for keeping things honest and true
- Straightedge to guide your cuts with precision
- Plumb bob and nail for vertical alignment (though this one’s really up to you)
- Trusty pencil for marking where the magic happens
- Rolls of your chosen wallpaper
- Sizable table to give you that cutting and pasting edge
- A pair of sharp scissors
- Ladder to climb the heights of your decoration dreams
- Wide putty knife to smooth out the bubbles of dismay
- Utility knife to trim the excess and perfect those edges
Preparing the Wall Surface
- Step 1
First up, you’ll need to clear the decks. That means whisking away any knick-knacks or art that adorn your walls, unplugging and removing plates covering switches and outlets, and scooching furniture out of the picture. Why all the hustle? It’s simple—a clean canvas is key for snag-free wallpapering. And, oh! A word to the wise: if water’s involved in your wallpapering escapade, cut the power to the room to prevent any shocking developments.
10 Renovation Tips for an Eco-Friendly Home
- Step 2
Next, take stock of your walls. Any dings, divots, or scrapes? Patch ’em up, pronto. You’ll want to wield that spackle knife like an artist, filling in the gaps and abrasions that could mar the wallpaper’s impeccability. Patience is a virtue here—let the spackle sit tight and dry thoroughly before progressing.
- Step 3
Sticklers for smoothness, take heed: you’ll need to sand those walls to a soft, silkiness that wallpaper will cling to like a dream. If you’ve spackled, be doubly sure to banish any spackle surplus with your sandpaper.
- Step 4
Time for a bath—the wall’s bath, that is. Whip out some water, a dollop of multipurpose cleaner, and a trusty sponge or rag to banish grease and grime. Then, give it time to air dry. No shortcuts—you want those walls bone-dry.
The Unexpected Benefits of Replacing Old Windows
- Step 5
Wallpaper primer isn’t just another layer; it’s your wall’s best friend. It ensures the wallpaper adheres but doesn’t overstay its welcome, facilitating future removal without a fuss. Plus, it keeps undercoat colors from photobombing your wallpaper. Reach for an acrylic-based primer unless the manufacturer directs you otherwise. Lay it on even-steven with a sponge brush and let it set to dry completely.
Here’s a tip that’s worth its weight in gold:
If the paint’s fresh, hold your horses for at least three weeks to let it cure.
Measuring and Cutting Wallpaper
Bring out the level and tape measure—it’s time to tally up your wall’s dimensions. Track width, and height, and align a true plumb line from top to toe in your wall’s midpoint. Whether you’re old school with a plumb bob or all about the pencil and straightedge, remember any nail holes will need patching.
The wallpapering waltz begins with the first step—or strip. Place it just right, and you’re golden; misstep here, and it’s a wobbly path ahead. Choose a starting corner and march on leftwards or rightwards, but once you pick a lane, stay in it.
- Calculate how many strips you need
Wall width divided by roll width equals the number of wallpaper soldiers you’ll enlist. If it’s not a round figure, squirrel away the decimal for later contemplation.
- First strip
Roll out your wallpaper with colors shy and patterns hidden. If it’s a dance of designs, pinpoint the pattern’s stage entrance at the ceiling and make your mark behind the scenes. With a smidge of surplus (a 4-inch encore is sage advice), measure your wallpaper to the wall’s height plus the extra. Straightedge in hand, draw a line, and cut a clean edge. Annotate the top and bottom on the backside to avoid any upside-down hiccups later.
- Serial Cutting
With your model strip as the muse, tailor the rest of your troupe to match its dimensions. If patterns play a part, ensure each strip’s design flows into the next with seamless precision. Allow for a little wiggle room—a bit of extra paper at the strip’s head and foot will keep the finished piece looking tiptop.
Application Techniques
For non-pasted wallpaper aficionados, the name of the game is to achieve a uniform spread of paste, and for this, nothing beats a top-notch roller. If the paste’s playbook calls for it, remember to book your wallpaper post-paste application.
On the flip side, if you’re in the peel-and-stick club, congrats! Prep work just took a backstage pass.
Embarking on the journey of hanging that inaugural strip of wallpaper begins in a room’s subtle nook—say, tucked behind a door or camouflaged by a grand armoire. Align one edge of the wallpaper with your plumb line, and with a modest overlap at the ceiling, employ your putty knife in a tender pressing motion along the upper wall seam.
Uniformed patterns yearn for precision, so marry the pattern’s starting dance mark with the wall seam. With an eye on plumb precision, descend cautiously, ushering the wallpaper into position from the center towards the periphery using your putty knife with a nurturing touch.
9 Signs It’s Time to Remodel Your Home
Banishing air pockets and unsightly wrinkles comes down to a technique that pushes from the paper’s heart to its bounds. Spot a bubble? Coax the wallpaper off the wall with a gentle hand and smooth it over to bid it farewell. Peel-and-stick users, you’ll be peeling downwards in sync with your descent.
Arriving at the trim stage means it’s time for your paper to make a crisp impression against both wall and skirting. Your putty knife becomes your ally once more, and you’re at a crossroads: snip away the surplus with the finesse of a utility knife or gently fold and guide your scissors along the crease.
Any rogue adhesive is non-grata—so post-application, let your putty knife ensure flawless edges before a damp sponge works its magic to erase any paste that dared to overstep its bounds.
As for hanging the subsequent strips, treat the process like a refined echo of the first. With precision and care, align each new member of your wallpaper sequence snugly beside its neighbor, ensuring the seams come together in a discreet kiss—no overlap, just a clean, tight embrace.
Now, when you approach the domain of switches and sockets, reduce the speed and treat the task with a scalpel’s precision. A gentle hand and a breakaway knife are your tools, crafting two vertical incisions alongside each fixture.
Scissors come into play for the horizontal cut—lift the paper slightly for superior control. What remains are flaps on top and bottom, and here the scissors tell their final tale, snipping neatly around the base. Once the outlet plate resumes its watch, your masterpiece is uninterrupted.
Mistakes to avoid: Finishing Touches and Maintenance
Reckon with the unpredictable—extra wallpaper should be part of your arsenal. Factors such as the design’s repeated pattern, or even simple slip-ups, might stretch your need for paper beyond your initial estimates. Contemplate the possibility of future modifications to your wall’s aesthetic, maybe tossing in some chic wall sconces, which would demand some wallpaper adjustments.
Steer clear of a wallpaper shortfall—stashing at least one spare roll isn’t just smart, it’s a game-changer. Nail your calculations precisely, especially as a newbie, and if you flub a panel, that surplus roll will be your peace-of-mind partner, dousing the heat of pressure. Shades can shift between dye lots—akin to textiles.
Tangled in a web of elaborate patterns? Hunt advises a strategic pre-layout of your wallpaper panels, ensuring the order is impeccable before you dive into the installation. A word to the wise: be vigilant that no critical part of your design—be it perching birds or other fine points—gets snipped from either end. A pro tip worth its weight: a dash of pencil on the reverse side of each section, duly numbered, plus a top-end indicator, can be an indispensable guide for some folks.
9 bathroom design trends that are here to stay
Choosing wallpaper that meshes with your environment
Mull over the everyday hustle-bustle as you ponder which wallpaper will grace your walls. If your corridors echo with the pitter-patter of little ones, perhaps veer away from wallpapers with a penchant for capturing stains, like those of a lighter hue or delicate make-up, such as silks—particularly where the traffic is relentless, like staircases.
 Latest Mobile Game Monetization Strategies