LED light strip installation has become one of the most popular and transformative home decor trends, offering homeowners an accessible way to create stunning ambient lighting, highlight architectural features, and infuse personality into any space. Whether you’re looking to add a warm glow to your kitchen, create a cinematic experience in your media room, or add a pop of color to your bedroom, proper LED light strip installation is key to achieving professional, polished results that elevate your home’s aesthetic. As someone who has installed hundreds of feet of LED lighting in both residential and commercial settings, I’ve learned that successful LED light strip installation isn’t just about sticking lights to a surface—it’s about planning, precision, and understanding how light interacts with your space to create the perfect atmosphere.
Understanding LED Strip Types and Quality
Before beginning any LED light strip installation project, it’s crucial to understand the different types of strips available and how quality impacts both the installation process and final result. From my experience, not all LED strips are created equal—cheap options often have poor adhesive, inconsistent color rendering, and shorter lifespans. High-quality strips typically feature better chips (look for brands using Epistar or Bridgelux chips), copper-backed PCBs for better heat dissipation, and IP ratings that indicate water resistance appropriate for your intended application. The difference becomes especially apparent during installation, as premium strips are more flexible, have better cutting points, and maintain consistent brightness across the entire run.
Essential Tools and Preparation
Proper preparation separates amateur LED light strip installations from professional-looking results. Based on my decade of experience, I always recommend gathering these essentials: a quality measuring tape, rubbing alcohol, and lint-free cloths for surface preparation, cable clips for managing wires, a reliable power supply with appropriate wattage headroom, and connectors that match your strip type. Perhaps most importantly, never skip the surface preparation step—clean surfaces thoroughly with isopropyl alcohol and allow to dry completely. This simple step ensures your adhesive backing forms a permanent bond, preventing the frustrating peeling that plagues many DIY installations months later.
Strategic Placement for Maximum Impact
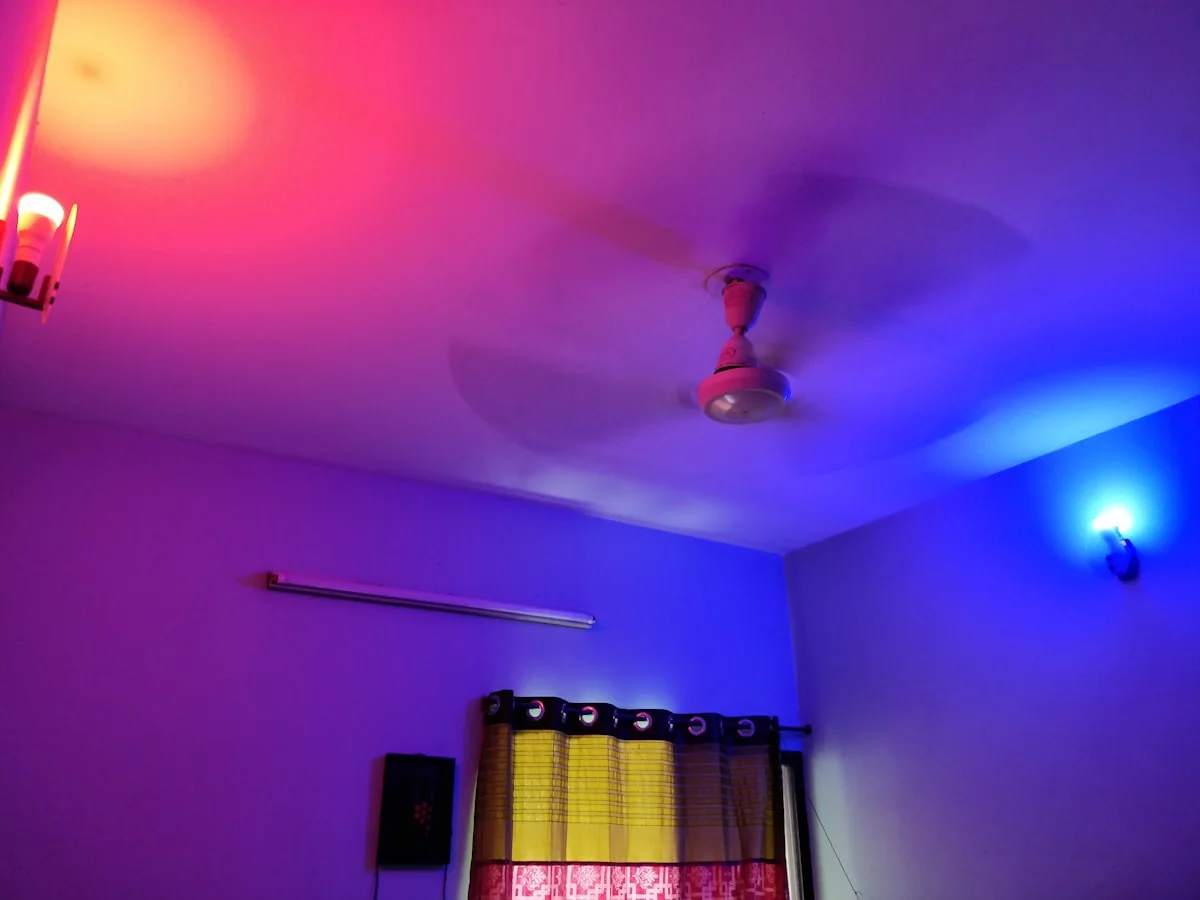
The magic of professional LED light strip installation lies in strategic placement that enhances your space rather than drawing attention to the light source itself. Through extensive trial and error in various homes, I’ve found that indirect lighting—where the strips are hidden from direct view but their light reflects off surfaces—creates the most elegant effects. For coves and recesses, measure twice and install once, ensuring the strips are positioned to cast light evenly without visible hotspots. In kitchen applications, under-cabinet placement should be toward the front edge to maximize counter illumination while minimizing shadows. The goal is always to create the illusion that the beautiful light simply exists, rather than obviously coming from installed strips.
Power Management and Electrical Safety
One aspect of LED light strip installation that many homeowners overlook is proper power management, which is crucial for both performance and safety. Having consulted on numerous installations, I always emphasize calculating total power requirements before purchase—add up the wattage per foot multiplied by your total length, then add a 20% buffer. Use a power supply with adequate capacity to prevent voltage drop, which causes dimming and color shifting toward the end of longer runs. For installations exceeding 16 feet, plan for power injection points where you can run additional wires to maintain consistent brightness. Always ensure connections are secure and protected, especially in areas where moisture might be present.
Advanced Techniques for Seamless Integration
For those looking to achieve truly professional results with their LED light strip installation, several advanced techniques can make a significant difference in the final appearance. Corner installation requires special attention—using flexible corner connectors or carefully mitering corners maintains clean lines without compromising light continuity. When working with multiple strips, pay careful attention to color matching between different rolls, as even strips from the same manufacturer can have slight variations. For the cleanest installation possible, consider using aluminum channels with diffusers, which not only protect the strips but also create beautifully even, professional-grade lighting without visible individual LEDs.
Smart Integration and Control Systems
Modern LED light strip installation increasingly involves smart home integration, transforming simple lighting into dynamic systems that adapt to your needs and moods. Based on my testing of numerous systems, I recommend choosing controllers that offer both local and cloud control options for reliability. Look for systems that support popular protocols like Matter for future-proofing your investment. Proper installation here means not just physically mounting the strips but ensuring your network can handle the additional devices and planning control placement for intuitive access. The best installations make the technology disappear, leaving you with effortless control over your beautifully illuminated spaces.
Troubleshooting Common Installation Challenges
Even with careful planning, LED light strip installation can present challenges that require troubleshooting. From my experience addressing countless installation issues, the most common problems include adhesive failure (solved with additional mounting clips or VHB tape), color inconsistency between strips (addressed with careful calibration), and voltage drop over long runs (fixed with power injection). One particularly valuable lesson I’ve learned is to always test your entire setup before final installation—connect all components and run them through various colors and brightness levels to identify any issues while everything is still easily accessible.
Maintenance and Long-Term Performance
A successful LED light strip installation isn’t complete without considering long-term maintenance and performance. Through monitoring installations over several years, I’ve found that quality strips typically maintain their brightness and color accuracy for 50,000 hours or more when properly installed with adequate heat dissipation. Dust accumulation can diminish light output over time, so plan installations in ways that allow for occasional gentle cleaning. For hard-to-reach placements, consider accessibility during your initial installation planning. The most successful installations are those that continue to perform beautifully for years with minimal maintenance required.
FAQs: LED Light Strip Installation
How do I choose the right LED strip for my installation?
Selecting the appropriate LED strip involves considering several factors including color temperature (warm white for cozy spaces, cool white for task lighting), brightness (lumens per foot), color accuracy (CRI rating above 90 for true colors), waterproof rating (IP65 for damp areas, IP67 for wet locations), and voltage (12V for shorter runs, 24V for longer installations). The right choice depends on your specific application, desired ambiance, and installation environment.
Can I cut LED light strips to fit my space?
Yes, most LED light strips can be cut at specific points marked with scissor symbols or copper pads. It’s crucial to cut only at these designated points to avoid damaging the circuitry. Always measure your space carefully before cutting, and remember that cut segments will require proper connectors to regain functionality if you need to navigate corners or connect to power sources.
How do I connect multiple LED strips?
Connecting multiple LED strips requires compatible connectors that match your strip type (common varieties include 4-pin, 5-pin, or addressable RGB connectors). For longer runs, you may need to use separate power injection points rather than daisy-chaining strips end-to-end, as voltage drop can cause dimming and color inconsistency beyond certain lengths. Always follow manufacturer guidelines for maximum run lengths between power connections.
What’s the best way to hide LED strip wiring?
Concealing wiring creates a cleaner installation. Use paintable wire channels along walls, run wires through existing conduits, or carefully tuck them behind moldings and trim. For power supplies and controllers, consider placing them in accessible but discreet locations like cabinets, closets, or dedicated electrical boxes. Planning your wire routes during the initial installation phase prevents visible cables that detract from your lighting’s aesthetic impact.


 Clean Stainless Steel Naturally: US Eco-Friendly Tips